Welcome to the world of seamless streaming and vast entertainment possibilities! Setting up a Google Chromecast can be a game-changer for anyone looking to elevate their TV viewing experience. Unsure of where to start or how to get the most out of your device? Don’t worry! In this guide, we’ll walk you through everything you need to know about setting up your Chromecast, along with tips on maximizing your IPTV experience.
Step 1: Unpacking and Connecting Your Chromecast
Once you’ve purchased your Chromecast, the first order of business is to get it out of the box and ready for action. Here’s how you do it:
Unboxing the Device
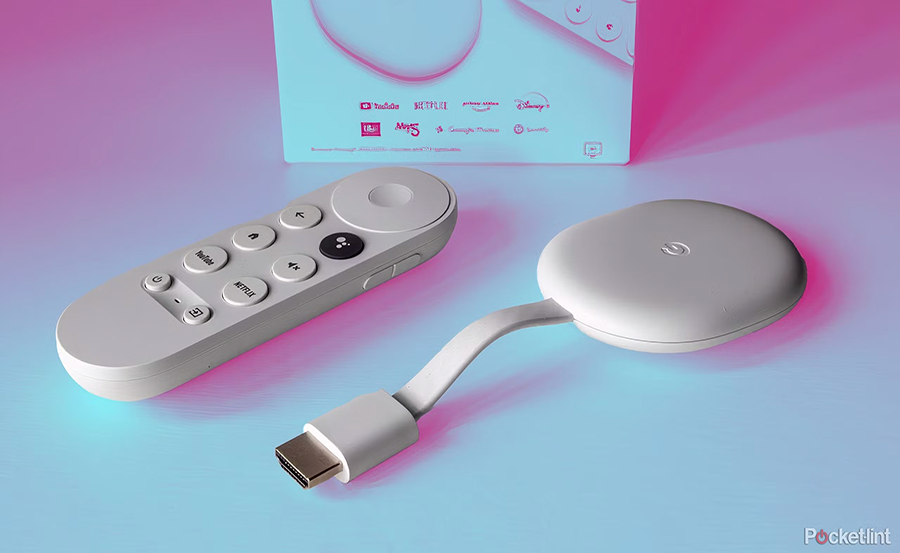
Opening your Chromecast package should reveal a few items: the device itself, a USB power cable, a power adapter, and a quick start guide. Double-check to see all components are in place. Manufacturers sometimes innovate the packing, ensuring minimal footprint and eco-friendly choices, so don’t be surprised if it’s snugly packed.
Smart Insight:
Never miss a beat with IPTV UK, designed for flawless streaming of your favorite content.
Connecting to Your TV
Next, plug the Chromecast into an available HDMI port on your TV. You’ll also need to connect the USB power cable to the Chromecast and plug the power adapter into a power source, unless you opt to use a USB port on your TV, which can power the device directly.
- Insert Chromecast into the HDMI port
- Connect USB cable to power source
- Ensure TV is turned on and set to correct HDMI input
Step 2: Setting Up via Google Home App
With the Chromecast properly connected, you’ll need to configure your device using the Google Home app, a handy tool available for both iOS and Android devices.
Downloading the App
Search for “Google Home” in the App Store or Google Play Store, download, and then install the app. If you’re running on older OS versions, ensure to update to a compatible version—there might be an extra step to granting permissions which can trip up some users initially.
Configuring the Device
Open the app and log into your Google account. Follow the prompts to add a new device. The app will guide you through steps of connecting the Chromecast to your Wi-Fi network. Make sure your phone is connected to the same Wi-Fi to facilitate smooth setup.
Step 3: Tailoring Your Streaming Experience
Setting up Google Chromecast goes beyond simple connection—it’s about tailoring your experience. Let’s explore how you can make your streaming experience truly unique.
Managing Device Settings
Once your Chromecast is up and running, dive into the settings to customize your experience. Rename your device, choose your preferred backdrop photos, or set a custom-friendly name.
Exploring: Best IPTV Service
This is where the magic happens. Consider investing in the best IPTV service to augment your viewing options. Many services offer extensive M3U playlists for IPTV, fractions of the cost compared to traditional cable.
Step 4: Casting Content to Your TV
With your Chromecast set, it’s time to enjoy your preferred content on a bigger screen.
Using Cast-Enabled Apps
Look for the Cast icon inside your streaming apps like Netflix, Spotify, or YouTube. Simply tap the icon and select your Chromecast-enabled TV. Remember, both devices should be on the same network, which sometimes can be muddy in extensive networks.
Using Browser for Casting
You can also cast a tab from Google Chrome on your desktop. It’s particularly handy for streaming services without a native app. Just click on the three-dot menu and select Cast.
Step 5: Maximizing Your IPTV Experience
Elevating your IPTV experience with Chromecast doesn’t have to be daunting. Here’s how you can make the most out of it.
Choosing M3U Playlists for IPTV
M3U playlists for IPTV give you the flexibility to watch a myriad of channels spanning genres and regions. Keep an updated list for uninterrupted viewing. Many IPTV services continually refresh these, aligning with global programming updates.
Addressing Streaming Buffer Issues
Experiencing buffering? Consider optimizing your network settings or upgrading your broadband plan. Sometimes, repositioning your router or directly connecting an Ethernet cable can significantly ease streaming woes.
The Journey Ahead: Embarking on Seamless Streaming
With Chromecast set up, you’re all set for a riveting multimedia journey. From accessing the best IPTV service to leveraging M3U playlists for IPTV, the possibilities are extensive. Whether it’s sports, news, movies, or music, your platform is now more dynamic and versatile than ever.
FAQs: Your Chromecast Queries Answered

What are the prerequisites for setting up a Chromecast?
A TV with an HDMI port, a smartphone with the Google Home app, and a stable Wi-Fi connection. A best IPTV service subscription is recommended for extensive content options.
How does Chromecast differ from other streaming devices?
Chromecast allows casting from multiple devices and supports M3U playlists for IPTV, catering primarily to users who favor flexibility in streaming content.
Can I use Chromecast without Wi-Fi?
While a direct Wi-Fi connection is ideal, you can use smartphone data tethering as a workaround. However, for seamless streaming and to maximize your IPTV experience, Wi-Fi is recommended.
Are there security concerns with Chromecast?
Ensure your network is secure, and regularly update your device and connected applications to maintain security. Avoid public Wi-Fi to mitigate risks.
By following these steps and embracing the possibilities with Chromecast, your viewing experience is set to reach new heights. Welcome to enhanced entertainment!
Understanding DNS Issues in IPTV and How to Fix Them


